Friday, January 29, 2010

Red Curry Vegetable Bowls!


Ingredients:

10 oz frozen corn
1 1/2 cup frozen bell pepper stir fry mix
1 1/2 cup frozen shelled edamame
1-15 oz can of Coconut Milk (I always use reduced fat)
1 T Red Curry Paste
2 t Soy Sauce
Optional: Basil for serving
Rice or Couscous for serving

Were I to make this again, I would add:
1- 15 oz can chick peas
1 sweet potato diced up, and pre-cooked

Directions:

Bring half the can of coconut milk to a boil. It should thicken up and bubble around the edges.
Whisk in curry paste and stir for 2 minutes, constantly.
Add in 1/2 cup water and remaining coconut milk. Cook 2 more minutes and bring to a steady, low boil.
Add the corn. Cook 2 minutes.
Add edamame. Cook 2 more minutes
Add Stir Fry Mix and soy sauce. Cook about 6 more minutes until veggies are tender and flavors are distributed. If you opt for chick peas and potatoes, add them in as well.

Serve over rice or couscous. I used couscous because I had a lot on hand. WE LOVED IT! Make sure to ladle curry sauce overtop dish so it soaks into the rice. I also chose to slice up some fresh basil to top it off. TOTALLY optional. 


This meal was cheap for us because I happened to have edamame and corn in the freezer and intentionally wanted to use them up. Obviously had soy sauce, so the grocery list was slim (that being the goal this week).

I was aiming for a "Meatless Meal" for both budget and for the nutritious benefits of some of the veggies. We were both FULL afterwards. Its healthy. Its easy. Its quick. Minimal cooking time. 

Enjoy :)

Wednesday, January 27, 2010

A FLAVOR PUNCH: Chicken Escondido


So, I did a little research. "Escondido" means hidden in spanish. It is also the name of a city near San Diego. I like the name hidden. There's a very hidden flavor to this dish that you've tasted NOWHERE else! Its a must try! We finished it off. I served it up alongside "Ultimate Spanish/Mexican Rice" featured early on in this blog. Let me tell you what- this rice is a real staple in the Sharp-household!

CHEAP grocery list:

- 1 lb chicken (Tenders, breast, cutlets, whatever you want) diced up into bite size pieces
- 2 T EVOO
- 2 T Balsamic Vinegar (I used Red Wine Vinegar since I had no balsamic!)
- 1/3 cup sun-dried tomatoes (NOT oil packed)
- 2 cloves of garlic, minced
- 1 can black beans, drained
- 1-16oz jar Salsa Verde (Green Salsa)


QUICK FIX:

1. Dice up your chicken
2. Heat oil and vinegar in skillet over medium heat
3. Add tomatoes and garlic and saute about 3 minutes


4. Add chicken and cook until done


5. Add Black Beans and Green Salsa


6. Boil for 5-7 minutes until well combined
7. Remove from heat, let it thicken up, and serve!

*If you do the rice, it takes about 50 minutes total, so start that WAY before the chicken! The chicken will only take about 20 minutes total, or less!*


Enjoy this "escondido" dish with quite a punch of GREAT flavor! And check out the rice recipe if you haven't tried it yet!

Monday, January 25, 2010

Don't Judge A Fish By It's Scales: Salmon Cakes and Sesame Noodles

Oh my. This was a winner among the ongoing recipe search. Absolutely delicious. I pulled both of these recipes off of eatingwell.com. If you don't like salmon, sub chicken or tuna. This was budget FRIENDLY, figure FRIENDLY, and VERY palate FRIENDLY! I promise, you don't want to pass this meal up! We scarfed it down!

Salmon Cakes

- 3 slices fresh whole-wheat sandwich bread
- 1 (15-oz) can of salmon, drained
(Make sure you buy boneless skinless canned salmon!)
- 1 egg beaten
- 2 scallions, finely chopped
1/4 cup finely chopped water chestnuts
-1/4 cup finely chopped cilantro (I did about 1 tsp dried)
- 1/4 t freshly ground black pepper
-1 T EVOO

First, break your bread into pieces and process in a food processor until you have very fine breadcrumbs.
Next, start flaking salmon apart in a mixing bowl with a fork.
Add the egg, and mix well!
Add  the scallions, water chestnuts, cilantro, pepper, and breadcrumbs. MIX THOROUGHLY.


Shape your mixture into 6-8 patties. I did 8 small ones, but you could do 6 slightly bigger ones if you'd like. I also put mine in the fridge for about 15 minutes just to make them hold together a little better before SKILLET TIME!


Heat your skillet over medium heat and add the oil. Add your patties to the skillet and cook for 5 minutes


After 5 minutes, flip them and brown the other sides for about 5 more!


Place on a platter and keep warm if your noodles aren't quite finished yet!


There is an optional sauce for these that I will include at the bottom. I took the easy way out, but incase you want it, scroll to the bottom before you finish reading!

Onto ...

Sesame Noodles

-1/2 pound whole wheat spaghetti
- 1/4 cup reduced-sodium soy sauce
- 1 T Sesame Oil
- 1 T EVOO
- 1 T rice-wine vinegar, or lime juice
- 3/4 t crushed pepper
- 1/2 bunch scallions, thinly sliced (reserve some for garnish)
- 2 T dried cilantro (reserve some for garnish) - OPTIONAL
- 2 cups snow peas
-1/4 cup toasted sesame seeds

First, cook your noodles for about 11 minutes. Drain, and rinse with cold water. (This dish is NOT served warm!)
Meanwhile, whisk together soy sauce, sesame oil, olive oil, vinegar, crushed red pepper, most of your scallions, and most of your cilantro.


I bought snow peas in bags, so i clipped the corner and microwaved each small bag for 2 and half minutes. Follow whatever directions come on your peas, or just steam/boil/cook them!
Allow peas to cool
Add the peas, and add your COOLED noodles.


You're ready to plate. I whipped up a little Miracle Whip with a splash or two of soy sauce for a topping on the salmon cakes.


Oh my goodness, these were so good together! We finished off the noodles and had a couple of salmon cakes leftover for lunches this week! THIS MEAL IS SOO GOOD, SO easy, and SO affordable! Try it out and ENJOY :)


Optional Ginger Soy Sauce Topping:

1/4 cup nonfat plain yogurt
1 T Mayonnaise
3/4 t freshly grated ginger
1/2 t sesame oil
1/2 t low-sodium soy sauce

Or just splash the soy sauce in the mayonnaise and cheat like I did!


Wednesday, January 20, 2010

Turkey Pesto Roll - A Real Hometown Favorite!

Another dish that reminds me of home. My mom made this like once a week growing up, then it tapered off, but now its back! We ate it a lot this summer, and I finally took the step of faith and tried my hand at it. It was pretty successful, but I had a good teacher!

Turkey Pesto Roll

1 lb ground turkey
1 egg
1 cup bread crumbs
1 cup basil leaves
1/4 cup parsley leaves
1/2 cup parmesan cheese
3 garlic cloves, peeled
1/4 cup oil
1/2 t salt
1/4 t ground black pepper
Some Kind of Tomato/Pasta Sauce to serve over top

We always serve this dish with whole wheat pasta, but choose any veggie or grain!

How to Start:

PREHEAT the oven to 375

Take the first 3 ingredients and mix/mash well in a large bowl


Now, on wax paper, or aluminum foil (I went with foil) - push down your turkey and form into a rectangle. DO NOT ATTEMPT TO DO SO WITH A ROLLING PIN. Just get your hands messy!


As you can tell, perfection is not required! Now, take the rest of your ingredients and put them all in a food processor.


Pulse until everything is well combined. GREEN IS GOOD!


Now, reserve about a tablespoon of that yummy pesto, and spread the rest all over the turkey:


Now, this is not hard, I promise. DON'T BE INTIMIDATED! Start to lift up the foil and roll the turkey. Kind of peel it off the foil as you go. Here's how it will start to look as you go


Keep lifting the foil, and rolling the turkey, until you have a soild roll. Place it seam side down on a greased baking sheet, and spread the remaining pesto over top


Bake in the oven for 40 minutes at 375 degrees. Meanwhile, heat up your pasta sauce to serve alongside, and if you are making pasta, start cooking it when this guy has about 15 minutes to go!

And when its ready, take it on out and start slicing it and serving topped with tomato sauce


You want to see the inside, don't you?

As you wish!


Its pesto all the way through- EVERY BITE! This dish is sooo good. Enjoy :)


Tuesday, January 19, 2010

Under the Sea: Blackened Tilapia over Jerk Rice with Lemony-Dill Green Beans!

Can you say that whole Title without taking a breath? I should have consolidated, but oh well! This weekend at Kroger, they were having a huge sale on Tilapia. We got 2 filets for only like $3.50. DO YOU BELIEVE THAT? Nick requested that I blacken the filets. I have never blackened fresh fish. Thats one of those things I order off of a menu and never consider making myself. In an effort to please my new husband, I took the challenge!

Blackened Tilapia

2 tilapia filets
1/2 lemon, juiced
1 T Olive Oil
1.5 T smoked paprika (I used regular)
1/2 t salt
1/2 T onion powder
1/2 t ground black pepper
1/2 t cayenne pepper (red pepper)
1/2 t dried ground thyme
1/2 t dried oregano
1/4 t garlic powder

Get your fish out. I layed mine on ceran wrap, but if you aren't a germ freak, just lay them on the countertop. Mix all SPICES together. SPICES ONLY!


Rub spice mixture into both sides of fish so that they are coated. You should see NO WHITE! Allow them to sit out 15 minutes before cooking. THIS IS AN IMPORTANT STEP! DON'T SKIP IT!


Heat oil over medium-high heat until oil is almost smoking out of the pan. Place the fish in the pan and cook 2 -3 minutes, flip them, and continue to cook 2-3 minutes, or until cooked to 135 degrees by a meat thermometer. Remove immediately and juice the lemon over them.


Is your mouth watering yet? Serve over Jerk-Rice

Jerk Rice (Made up by ME)

1 cup brown rice
3 cups water
1 tsp chicken bouillon (or just use 1 cup chicken stock and less water)
1 tsp jerk seasoning
1/2 tsp thyme
1/2 tsp oregano
1 t oil

Cook rice in oil along with thyme, oregano, and jerk seasoning. After toasting about 5 minutes, add water (Or chicken broth), and chicken bouillon cubes. Bring to a rolling boil, then reduce heat, and simmer about 40 minutes. Monitor water, you may need to add water if the rice absorbs all the liquid too quickly.


And now for the beans!

Lemony-Dill Green Beans:

1 bag (24 oz) Frozen Green Beans (or the equivalent of fresh)
1/2 cup dry roasted and slivered almonds
1/2 lemon, juiced (the half remaining from the fish dish)
3 sprigs of fresh dill, chopped
1 clove of garlic, minced

First, cook your beans. I cover my skillet and heat the frozen ones 7-10 minutes. Remove them from the heat, and set aside

Add oil to the skillet. Cook toasted almonds, garlic, and dill. (You may need to toast yours BEFORE this step if you buy them plain which I DO!)


Add beans back into the skillet, pour lemon juice in, and mix well. They are ready to serve!


Enjoy all of these recipes together, or completely separate! We had no leftovers, as usual!


Monday, January 18, 2010

White Chicken Chili - A la Mama!


So, this is a recipe I'll keep forever. You know this dishes your mom makes growing up that just TASTES like home and all those memories you have of it? This is it for me. Nick loves it and grew up with a similar recipe from his mom- so its a sentimental dish for both of us. And what better way to kick off the season premiere of 24???!!!


The List:

- It calls for 4 cups of cooked chicken, i buy about 1.5 pounds and boil, then shred it
- 4 cans of canellini beans rinsed and rained, or 1 lb dried
- 6 cups of chicken stock
-2 onions, chopped
- 3 cloves of garlic, minced
- 1 bag of white frozen corn
- 1 tsp Olive Oil
- 2 4oz cans of diced green chiles
- 2 tsp Cumin
- 1.5 tsp Oregano
- The juice of 2 limes


- Shredded jack or cheddar cheese for sprinkling
- We like to add oyster crackers, but you could do cornbread or any dipper you like!

So, there are many ways to approach this. You could slow cook, but it isn't necessary. If you are using dried beans, go ahead and soak them overnight. In the morning, drain them, cover with new water in a soup pot, bring to a boil, then reduce heat and simmer 40-50 minutes until beans are soft.

If you are going to boil your own chicken- here is the "Technical" method- but do whatever you like! I cover mine in about 2 inches of water, or more. I bring them to a boil, then reduce the heat, and allow to simmer 15 minutes. Remove from heat, drain, and allow them to cool before shredding. You don't have to let them cool, but your asking for a chicken steam facial if you don't.

With all that aside, here's what you do!

The Process

1. Combine broth, beans, and ONE of the chopped onions in a large soup pot. Bring to a boil, reduce heat, and simmer for 2-3 hours until beans are very soft. Monitor the soup, you may need to add some chicken broth if it starts drying out.


2. Add lime juice and corn to the pot after it has cooked for the amount of time above.


3. In a skillet, heat oil over medium-high heat and cook the onions until translucent, about 5-7 minutes.
4. Add chile peppers to the skillet as well as the cumin and salt. Mix well.


5. Add chile and onions to the main pot as well as the shredded boiled chicken (or your pre-cooked diced chicken!)


6. Stir them in well, and allow the chili to cook/simmer for another hour to combine flavors.


It should cook down to something like this!

You can either top with cheese, or just grind some salt and pepper over the top to serve!


Thursday, January 14, 2010

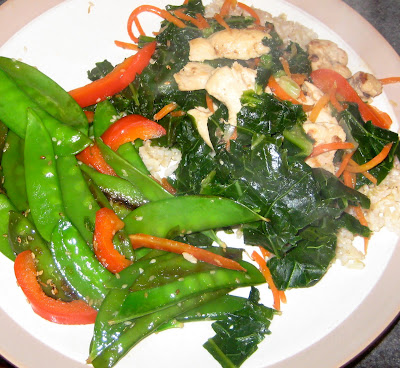
Soy Ginger Chicken with Sesame Snap Peas .... Make your OWN take out!


This recipe is a healthier version of chinese take-out :) Always go for the brown rice (Long Grain is better if you can find it!) Steer clear of sodium-high traditional chinese dishes by choosing this one! Here's what's on the grocery list:


Ingredients:
1/2 cup soy ginger sauce*
1 pound chicken breasts, cut into thin strips
(I sliced my chicken very thin, the way they do in a Mongolian Dish or Cashew Chicken dish)
6-8 cups assorted fresh winter greens (Kale, collards, mustard, chard, bok choy)
2 T Olive Oil
2/3 cups julienned carrots
1/2 cup chopped scallions
(Make Carribean Turkey Burgers with leftover scallions!)

*The soy ginger sauce I found was at Whole Foods. VERY low calorie, low sugar, low fat. If you are going to a local grocery store, just look for a soy ginger asian sauce with acceptable nutrition for your family's diet*

Here's How I did it:

If you have time, its always best to marinate your chicken as long as possible. Even overnight if you can remember! The LONGER that sauce can be in contact with your meat, the BETTER flavor you'll gain. I sliced my chicken very thin, put it in a gallon zip lock bag, added the sauce, and put it in the fridge that morning to start marinating. GIVE IT AT LEAST 30 minutes if you forget to start it early!


Next, you want to wash your greens. Trim them and chop them up, roughly. Bring a large pot of water to a rolling boil, and place the greens in there for about 3-4 minutes. DRAIN IMMEDIATELY. You are just blanching them.


Now, have a bowl of ice water ready- you're going to throw them right in it to stop the cooking process! This will allow the leaves to retain that bright green color which means YOU retained the majority of the nutrients in the leaves! Once cool, drain, and set aside.


Time to WOK it up!


In a large saute pan, or wok, heat your olive oil over medium high heat and saute chicken for about 5 minutes until browned and cooked through


Remember: the thinner you slice the chicken, the quicker it will stir fry
Also, remember at some point along the way to start cooking your brown rice


Now, add your carrots, scallions, and cooked greens. Saute another 3-5 minutes, tossing to mix ingredients.


Once you are ready, serve this over brown rice with additional soy ginger sauce.


But wait! Now its time for your side dish! These easy Sesame Snap peas compliment the meal well. They were yummy, cheap, and best of all, EASY! I would recommend starting them as soon as you start to stir fry the chicken. They have a similar cook time!


What you'll need:
1 T Sesame Oil (I bought TOASTED sesame oil because its sounded yummy)
1/2 pound snow pea pods (About 2 cups)
1 T Sesame Seeds
1 Medium Red or Yellow Bell Pepper sliced thin


Those green onions go with the stir fry, don't be confused!


What to do:


-Heat your sesame oil in a large skillet over medium-high heat.
-Add your pea pods and sesame seeds. Cook about 2 minutes, stirring frequently at first to distribute oil.


Add in your red bell pepper, cover, and continue to cook 5-7 minutes, STIRRING FREQUENTLY until veggies reach desired tenderness. We kept ours pretty crisp. I kept them covered more to the 5 minute mark!


Serve alongside Chicken Stir Fry and Rice for a Chinese Take Out turned HEALTHY!


Enjoy :) We hardly had leftovers!


It just LOOKS healthy, doesn't it?!


Tuesday, January 12, 2010

White Bean and Winter Green Soup ... It's a Keeper!

So, allow me to preface before diving into this recipe. First of all, I hardly took pictures because, I made the majority of this recipe up, and figured by doing so, it would be a flop. I WAS WRONG! And so I have one picture of it cooking to show you :( But believe me when I say, this will warm you up on any cold winter evening and you'll feel satisfied, but not too full, at all! We enjoyed it and will be having leftovers this week! It makes a lot!

Also, like I said, although I was inspired by a recipe on wholefoods.com - this dish is really a dish I created in my mind the longer I thought about it, as well as one I created based on leftover veggies in my refrigerator! You could leave a lot of it out, and I'll let you know when that option comes along!

Lastly, its going to call for Chicken Sausage. If you live near a Whole Foods- they have AWESOME chicken sausage. Mine were spinach and feta flavored. They also have like sun dried tomato ones etc. BUT- you can use turkey sausage or any chicken sausage you find at your local grocery!


The "Recipe" (Loose as it may be!)

12 oz of Chicken Sausage (I used spinach and feta sausage)
2 - 32 oz Jugs of Chicken Broth (Reduced sodium if you can find it!)
1 T Olive Oil
3-4 garlic cloves smashed and minced
1 white or yellow onion chopped
1/2 red bell pepper chopped (Optional, I had it in my fridge!)
1 cup julienned/sliced carrots (Optional, I had them in my fridge for tomorrow's dinner!)
Salt and Pepper to Taste
1 bunch of Kale, ribs and stems removed, leaves torn or chopped
7 cups of cooked white beans (Equal to about a bag and a half of dried beans)
*If you buy dried beans, soak them overnight, then boil for about an hour until soft the next day*
Italian Spices/Seasoning
 (Optional- you could use any italian spices- rosemary, thyme, parsley, oregano etc.)

Method:
IF YOUR BEANS ARE DRY- you need to soak them in water at least 8 hours, preferable over night. Then, cover with water and bring to a boil. Reduce heat and simmer for an hour until soft
IF YOUR SAUSAGE IS RAW (Meaning not pre-cooked)- you'll need to boil or steam them so that they are ready to throw in the dish!

1. Put about 1/4 cup of broth in the bottom of a large pot. (I used a dutch oven) Add Olive Oil. Heat over medium heat.
2. Slice up your sausage and toss it in. Let it cook until liquid is absorbed, stirring constantly. They should start to brown up in the olive oil.
3. At this point, add your garlic, chopped onion, chopped pepper, and carrots. If they start to stick to the bottom, splash some chicken broth over them. Let them cook about 5 minutes and soften up.
4. Add the rest of the chicken stock to the pot, along with the cooked beans
5. Bring to a boil. Add kale, cover, reduce heat, and simmer about 5 more minutes.
6. Add in salt and pepper as well as any italian herbs/spices you want TO TASTE.
7. Once heated through, it is ready to serve at any point!

Optional Toppings: Crutons, Torn Stale Bread, Oyster Crackers, Red Onions, Red Pepper Flakes, Hot Sauce.

ENJOY :)


Go Fish.... Salmon Packets!

Salmon WRAPPED and topped with Orange Chipotle Salsa

Anyone else afraid to cook fish? Because I am. But, I decided, since I had a Whole Foods gift card, I was going to buy some King Salmon! BECAUSE I COULD! And I did. I have a couple of things to say. First of all, I recommend going somewhere where you can ask them to cut 4 oz filets for you. Don't try and buy some frozen salmon and do this yourself- unless you are an acclaimed chef. Let the seafood experts handle it. OH- tip- ask for the the part of the salmon with the least amount of bones!

Anyways, these little salmon packets were quite tasty. The recipe calls for swiss chard- which I recommend. I ended up using collard greens, and they WORKED, but, not the taste I was expecting. ALSO- my leaves browned up, but I think I know how to save you from that experience, read it in the directions.

I have a sneaky suspicion, NO ONE will try this recipe, but- for my few adventurous cooks out there, this is for you!

Note: This recipe only serves 2. You would need to increase the fish and the greens depending on how many you want to serve.

What You'll Need:

2- 4 oz Salmon Filets
2 Swiss Chard Leaves (Or Collard Greens)
1 Small Orange
1 Chipotle Pepper in Adobo Sauce
Salt and Pepper to Taste
2 t Olive Oil

Optional:
I served mine with some Trader Joes Mushroom Risotto.
If you live near a Trader Joes, make the trip. Any risotto would pair well with this dish, so find one that you like! All you do is put a little olive oil in, add the rice, add the seasonings, and add water. Not hard at all!

Directions:
1. Preheat your oven to 425 degrees and coat a baking dish with cooking spray
2. Grate your orange into a small bowl
3. Peel and chop your orange (Remove seeds if necessary)
If you've never peeled an orange, use a paring knife (Not a potato peeler!) Get rid of all the white pithy part!


4. SEED your chipotle pepper(unless you love fire hot salsa!) and chop very finely
5. Combine orange rind, orange pieces, chipotle pieces, and 1 tsp of the olive oil.  Mix together to form salsa mixture and set aside


6. Prepare salmon filets by brushing with remaining 1 tsp of olive oil, and sprinkling with a little salt and pepper


7. Now, take your 2 Leaves (Swiss Chard or Collard Greens) and SMASH the rib (center) of the leaf with a fork to make the leaf more pliable

8. Place a salmon filet on each leaf. Top with half the salsa.


9. Now, just roll them up, and fold in the sides to form a tight packet around each filet.
10. Place seam side down in a baking dish


11. Bake in the oven for about 20-25 minutes. If you have a meat thermometer, cook to about 135 degrees.

Now, my leaves got pretty browned up. I would suggest maybe dipping the leaves in some chicken broth before wrapping around the salmon, OR, drizzle some water or brother over top after rolling them up! Just a suggestion!

12. Remove from oven, serve with rice, risotto, or any side of your choice!


Cut it open, and you should have a steamed-fresh orange chipotle filet:


If you are sketched out by the leaves- just wrap them in some parchment paper! Same effect. Not sure what the cooking time would be, but probably pretty similar. Its the same idea, this recipe just give you an edible packet!!

ENJOY :)