Sunday, May 23, 2010

Jerk Turkey Burgers with Grilled Veggie Skewers!

It's time to introduce you all to the latest addition to our family. Webbie! (Our grill!) He did all the work to make this meal, and it was quite tasty! If you don't have a grill, feel free to broil this. I've made these burgers in the oven before, and you can always roast veggies in the oven! Either way, you'll enjoy this one! PROMISE!


Jerk Burgers:

Looks like a lot of ingredients, but its mostly spices you have on hand! 

1/3 cup whole wheat couscous (yes, you can use regular)
1/2 cup water
1 pound ground turkey
1/2 cup finely diced red bell pepper
1 tsp dried thyme
1 tsp curry powder
1/2 tsp cumin
1/2 tsp allspice
1/2 tsp ground ginger
1/2 tsp salt
1/4 tsp ground black pepper
1/4 tsp paprika
1/8 tsp cayenne pepper

Combine couscous and water and let it stand for 20-30 minutes to absorb all the water and soften up.

Meanwhile, heat oil in a small nonstick skillet. Add bell pepper, garlic, thyme, curry powder, cumin, allspice, ginger, salt, pepper, paprika and cayenne. Cook until bell pepper is softened a little (about 1-2 minutes)

Combine all ingredients. Turkey, bell pepper mix, and couscous. Mix WELL and form into patties. You should get about 6 good sized burgers. Grill until browned and no longer pink on the inside. Cooking times will vary!

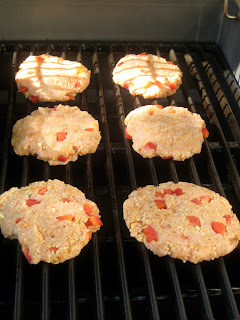
I had to take some shots of them on the grill!


Look at these grill marks!


Now, you do have the option to serve these on buns with lettuce and tomato like any other burger! We just didn't!

Grilled Veggie Skewers

3 bell peppers (I used green because they are cheapest!)
1 red onion
1 yellow squash
1 zucchini
Olive Oil
Salt and Pepper
2 garlic cloves, pressed or minced

You'll want to core your peppers and the cut into 1 inch pieces. For the onion, cut it into quarters and then peel off the layers one at a time. For the squash and zucchini, cut in half lengthwise, then slice into inch thick pieces. 

Then, toss them in oil, salt, pepper, and garlic. Skewer in any variety you choose!


On they go!


Oh, just look at these!

Serve it up. Healthy, low car meal right here!


Enjoy! They are easy, they are summer-y, and they are delicious!


Monday, May 17, 2010

Grilled Salmon with Fresh Salsa, add corn!

Grilling Season is officially OPEN. I declare it. Mainly because we received a beautiful new grill as a housewarming gift from Nick's parents, but also because, we love grilled food :) Nick's birthday is coming up, so since he requested some grilled salmon, I splurged and went to Fresh Market to buy 2 filets for us to grill up for an early celebration!

While I was shopping, Publix had corn on sale- 8 ears for 2 dollars! Well I only needed 2 ears, so it cost me all of 50 cents to add corn as a side dish!


Oh man, this was so good! Nick actually said "This goes on the list of Top 5 meals of all time!" So, you know it must be good! For those of you who are money conscious (which we usually are) - I think you can buy frozen filets and let them thaw out before you grill them. So don't be scared of this meal, you'll be missing out!

For your Salmon:

You will want about a 10 oz piece of salmon per person
1 T Olive Oil
Salt and Pepper

For your Salsa:

1-2 Roma tomatoes finely diced
1 T finely diced red onion
1 T lemon juice (fresh)
1 T fresh chopped parsley
1 T fresh chopped dill
1/4 tsp Worchestire sauce (I can't spell that)
1 T rice wine vinegar
1 clove of garlic finely minced

We placed our salmon in a fish basket that allowed us to flip it easily. If you have skin removed, you'll want to cook the fish on both sides about 4-5 minutes. If the skin is still on, cook with the skin side down until done. (Internal temperature of 150 degrees) We cooked it over medium-high heat. 

Make sure to spray your grill, or rub the skin with oil to allow easy flipping and no sticking/flaking apart!

Meanwhile, mix together the ingredients for your salsa. When fish is done cooking, top with salsa and serve!

If you want to grill corn alongside you have 2 options:

1. Peel husk down (do not remove.) Discard silky strings from the corn. Soak corn about 30 minutes before cooking. Pat dry. Rub with butter and add any flavor you'd like to the inside. We added garlic powder and a little butter! 
2. Remove husk and silky strings. Soak for about 30 minutes. Pat dry. Place on a square of aluminum foil. Rub with butter and add any flavors you'd like. Wrap in foil!

To grill, just place them right on! You'll want to turn them about every 3-4 minutes, for a total of about 12 minutes. Make sure each side gets a turn on the heat! Soaking the corn allows it to steam the kernels while it grills. This will be the juciest and most delicious corn you've ever put in your mouth! Guaranteed!


I also made Trader Joe's "Harvest Blend" pasta. Add a sprig of dill, a sprig of parsley, and a lemon slice to dress this plate up. Doesn't that just look like a keeper? Imagine how it must taste!

Enjoy :) And get those grills ready for some new recipes!


Wednesday, May 12, 2010

Mediterranean Chicken Roll Ups - OMY!

OMY stands for Oh My Yum! These were outstanding. Such great flavor combination! Nick called it a keeper. I already stored it in my recipe favorites. You'll want to try this out!

You will have many options when it comes to the chicken. If the thin sliced cutlets are on sale, buy them. If its the chicken breast or chicken breast halves on sale, buy them. You can make this work either way! I wish you could see the stuffing inside, but I couldn't get a good enough picture once I cut into the chicken!


Ingredients:

1/2 cup shredded skim mozzarella cheese
1/2 cup reduced fat crumbled feta cheese
1/4 cup kalamata olives, chopped finely (and pitted if necessary!)
1 T of capers (I did 2 or more!)
1/2 cup oil packed sun dried tomatoes

(Combine all of these ingredients in a bowl and mix together)

4 boneless chicken breast halves (Or about 1 lb of thin sliced cutlets)
1/4 cup balsamic vinegar
1 can Italian diced tomatoes

Preheat oven to 350.

*If using breasts, slit them deep and stuff evenly with mixture
*If using cutlets (as I did)- place a little stuffing in and roll them up.

 Place chicken (seam-side down if roll-ups) in a greased/sprayed baking dish.
 I had extra "stuffing" so I just sprinkled it on top of the chicken. Add a little salt and pepper.


Mix together balsamic vinegar and tomatoes and pour over the chicken.


Bake, uncovered, for 40 minutes, or until chicken is cooked through.

Enjoy. This was so good. We will be repeating :)


Easy and healthy Chili-and-Basil Chicken Noodle Stir Fry ... Fast Food!

I'm so sorry I've left you guys stranded for a good week or so. Moving into a house and working a lot of overtime has made posting on the blog quite a challenge. Not to mention the week we went without internet! BUT I'M BACK! And I promise I have some gems to share with you!

Chili-and-Basil Chicken Noodle Stir Fry

This was delicious, and right out of a Weight Watchers magazine! Very affordable, very quick, and very yummy! Fast food Chinese :) You'll love it!


1 pound boned, skinned chicken breast thinly sliced
6 oz Soba Noodles (Ramen Noodles will work)- uncrumbled/uncooked
3 T Soy Sauce
2 T fresh Lime Juice
1 T Chili Garlic Sauce
1/4 cup low sodium Chicken Broth (plus 1 Tablespoon)
1 tsp cornstarch
1 T Olive Oil or Canola Oil
3 Green Onions sliced
1/3 cup fresh small basil leaves (or chopped basil)


1. Cook noodles according to package directions, omitting any salt/oil/butter/seasoning packet.

2. While pasta cooks, combine soy sauce, lime juice, chili garlic sauce, and tablespoon of chicken broth.  Combine chicken with 2 Tablespoons of the soy sauce mixture.

3. Add remaining chicken broth and cornstarch to remaining soy sauce mixture. Set aside

4. Heat oil in a large, nonstick skillet over medium-high heat. Add chicken and cook about 5 minutes until done. Stir frequently. Add noodles and soy sauce mixture; cook about 1 minute or until sauce thickens. Top with green onions and basil. Serve immediately.


Enjoy :) This was just too easy and too good- don't pass it up!