Monday, March 29, 2010

Healthy Herbed Potato Salad .... Perfect for Spring and Summer!

So, this past weekend, I got in the mood to make a spring/summer side dish. I wanted something fresh and potato salad was sounding good. I found a recipe from Cooking Light and decided to test it out. I really, really liked this alternative to mayonnaise loaded potato salad. Sour cream and yogurt will be your "sauce" and you will have NO guilt whatsoever scooping yourself spoon fulls of this picnic-perfect side dish! I do suggest doubling this recipe if serving more than 4.


Ingredients List:
  • 2  pounds  Yukon gold potatoes (You could use other varieties)
  • 3  tablespoons  white wine vinegar
  • 1/2  cup  plain low-fat yogurt
  • 1/4  cup  reduced-fat sour cream
  • 1  tablespoon olive oil
  • 1/2  cup  finely chopped red onion
  • 2  tablespoons  chopped fresh parsley
  • 1  tablespoon  chopped fresh dill
  • 1/2  teaspoon  salt
  • 1/4  teaspoon  freshly ground black pepper
  • 1  garlic clove, minced
Directions:
Peel potatoes, place in a saucepan, and cover with water. 
Bring to a boil. Reduce heat; simmer 15-20 minutes or until tender. 
Drain. Cool slightly.
Cut potatoes into bite size chuncks. (Aboug 1-2 inch cubes)

Place them in a large bowl; sprinkle with vinegar.
Combine yogurt and sour cream in a medium bowl, stirring with a fork until smooth. Add oil and stir.
Add onion and remaining ingredients; stir.
Add yogurt mixture to potato mixture; toss gently to coat. Cover and chill 1 to 24 hours.

I did mine a day ahead of time to really get that dill and parsley to come out and WOW did it ever. So refreshing and so tasty! You won't miss the mayo! Try it ....


And enjoy it :)


Friday, March 26, 2010

Every Step of the Way ... Homemeade Pizza

These are some recipes I want you to play around with. I went for EXTREME homemade Pizza last night. Crust? Check! Sauce? Check! Toppings? CHECK!

You could make the crust, and then store buy everything else. Or, you could make the sauce, and store buy everything else. OR, you can play around and totally make YOUR own personal recipe for a delicious pizza!

Whole Wheat Pizza Crust
(This makes 2 pizza crusts. Save one in the freezer for the next Pizza night!)

3 1/2 cups whole wheat flour
2 packets dry active yeast
1/2 tsp sugar
1 tsp salt
1/2 tsp olive oil
Extra flour for rolling out the dough
Cornmeal for sprinkling on baking stone/sheet

Combine flour, yeast, salt, and sugar. If you have a stand mixer, use the dough insert and allow it to run on low speed. While mixer is running, add water gradually and let it knead for about 10 minutes. (If by hand, you'll have to knead it yourself for about 10 minutes)

At this point, turn the machine off. Drizzle oil down the side of the bowl, and knead on low about 15 seconds to coat the bowl and the dough with a coat of oil. If by hand, put oil in a bowl and then roll the dough ball around in it until coated!

Cover bowl with plastic wrap and let rise in a warm place for about 2 hours. It should double. 


Preheat oven to 500 degrees. If using a pizza stone, place in oven while its preheating. DO NOT do this with a baking sheet!

Punch down the dough and then divide in half. (At this point, ball one up and freeze it for later if you aren't making 2 pizzas!)

Cover counter top with flour. Stretch dough out with hands, and then roll out dough to desired size.

Slide onto baking stone, and top with sauce, cheese, and any desired toppings you'd like!


Homemade Tomato Sauce (Good for pizza OR Pasta!) 
28 oz can whole tomatoes (Or crushed if you don't like chunky sauce)
1/2 cup chopped onions
2 tsp oregano
1/2 tsp sugar
2 T tomato paste
1 clove of garlic, minced
2 T Balsamic Vinegar
Salt and Pepper to Taste

All you need to do for this is saute your onions and garlic in a sauce pan. Add remaining ingredients (Except Vinegar). Bring to a boil, then reduce and simmer until it reaches desired consistency. Right before pulling off of the heat, stir in balsamic vinegar. (I crushed SOME but not all of the tomatoes!)

Save for pasta or pizza nights!

For this pizza I made yesterday (Which was Nick's all time favorite) I simply made the crust, topped it with some chunky homemade sauce, a good handful or two of skim mozzarella, and then had made some caramelized shallots (you could use onions) to put on top.

If you've never caramelized before its easy.

Caramelized Onions/Shallots

Take 1 or 2 onions (5 or 6 shallots) and slice them very thin. 
Toss them into a DRY skillet over medium-low heat. Once they start cooking, but not browning, add a little salt to get them to release their liquid.
Once skillet dries up again, add about 3 T of water or more. You kind of want to cover the bottom of the skillet. No precision necessary here. Cover them and let them cook about 10 more minutes until water is absorbed and they pick up a caramel brown color. 

Throw these in pastas, pizzas, paninis, omelets, YOU NAME IT! They are AWESOME.


Like I said earlier - take liberty with this! We ate the whole pie! I can't lie to you!
Enjoy :)


Thursday, March 25, 2010

Almond Crusted Baked Chicken Tenders!

If you are craving an EASY go-to, healthy, classic dinner - this is it! These are SO good. Dip them in a little ketchup and you'll feel like you just stepped back into your childhood. The great thing about them is they are oven baked, NOT fried. And believe me, you won't miss that deep fried taste once you bite into these guys!

I got this recipe (a couple years ago actually) off of Eating Well's website. It has been a keeper from that day on! I would usually go with sweet potato fries - but we had leftover Orzo Salad from a small group event the night before, so it saved me from cooking one more thing. Don't pass these up!


Ingredients:

  • Canola oil cooking spray
  • 1/2 cup sliced almonds
  • 1/4 cup whole-wheat flour
  • 1 1/2 teaspoons paprika
  • 1/2 teaspoon garlic powder
  • 1/2 teaspoon dry mustard
  • 1/4 teaspoon salt
  • 1/8 teaspoon freshly ground pepper
  • 1 1/2 teaspoons extra-virgin olive oil (I accidentally left this out, and they turned out fine!)
  • 2 large egg whites
  • 1 pound chicken tenders (If you are serving more than 2, adjust accordingly)
Directions:

1. Preheat your oven to 475. Line a baking sheet with foil, and then set a wire rack (like a cookie cooling rack) on the baking sheet and coat it with cooking spray.
2. Place almonds, flour, paprika, garlic powder, dry mustard, salt and pepper in a food processor; process until the almonds are finely chopped and the paprika is mixed throughout, about 1 minute. With the motor running, drizzle in oil; process until combined. Transfer the mixture to a plate or shallow dish. (Again, I didn't do the olive oil and all was fine.)
3. Whisk egg whites in a second shallow dish, or bowl. Add chicken tenders and turn to coat. Transfer each tender to the almond mixture; turn to coat evenly. Place the tenders on the prepared rack. Once all have been dipped and placed, coat the tops of them with cooking spray. Then flip them, and spray the other side.
4. Bake the chicken fingers until golden brown, crispy and no longer pink in the center, 20 to 25 minutes.


Oh, enjoy these :) I know you will!

Tuesday, March 23, 2010

Authentic Chipotle Chicken Tacos

I found this recipe on another website, and kind of tweaked it to make it my own. Nick and I really enjoyed these tacos. We had found these AWESOME corn tortillas at Kroger (of all places). They were very soft and very tasty! You could put these on tortillas, hard tacos, or just serve it over lettuce and make a taco salad type dish. Either way you eat it, you'll enjoy it, guaranteed! I, of course, made the staple - SPANISH RICE. I'll give you the link to that later on!


Ingredients for Chicken Tacos:

2-2.5 pounds chicken (Boiled and shredded)
3 tablespoons olive oil
2 onions, sliced thinly
5 garlic cloves, minced
3-5 chipotle chilies in adobo sauce (I used 4- not too spicy)
28 ounces diced tomatoes
1/2 cup chicken broth
1/2 teaspoon ground nutmeg
1 1/2 teaspoons ground cumin

Pico de Gallo
1 large red onion, diced
2 tomatoes, diced
3-4 tablespoons fresh cilantro, minced
1 teaspoon salt
1/4 teaspoon pepper
1/4 lime

Start by making the Pico de Gallo. You want to make this as far in advance as possible. The longer it sits, the better it gets. General rule for all pico de gallos/salsas/etc. I made mine probably 4 or 5 hours ahead of time. Just combine the red onion, tomatoes, cilantro, salt and pepper. Squeeze the wedge of lime over top and toss. Put in the fridge and forget about it!


Now, if you haven't already, boil your chicken, allow it to cool, and shred it up. This can be done ahead of time and can sit in the fridge as well. The sauce will reheat the chicken when you add it to the pot!

In a large pot, add your olive oil and cook onions and garlic until very soft. 


While they soften, in a food processor or blender, combine remaining ingredients. (Chipotle peppers, tomatoes, cumin, nutmeg, chicken broth.) Puree until smooth.

Pour the sauce into the pan with the onions once they are softened. Cook about 5 minutes, and then add the shredded chicken to the pot.


You'll want to cook this down until the majority of the sauce is absorbed by the meat and the dish is heated throughout (This does NOT take exceptionally long)

If you are interested in serving rice alongside, why don't you make some of my Spanish Rice
*Note: If using brown rice, it takes about 40ish minutes for rice to fully cook, so allow for that time. White rice won't take nearly as long*

Also, sprinkle some of that leftover cilantro from the pico de gallo over the rice before serving. YUM!


Ready to plate it up? Lay out your tacos and top with some meat


Give them each a hefty scoop of pico de gallo


Pass them around, and enjoy :) We loved them and will be making them again!

Thursday, March 18, 2010

Kiss Me! I'm Irish Soda Bread!

So, Nick and I were invited over for a St. Patrick's Day dinner at my parent's house. My mom's side has Irish blood in it (I claim it- I mean, I do have the red hair, green eyes, and freckles- come on!) Anyways, she was making corned beef and cabbage (SO GOOD). I told her I would bake up some Irish Soda Bread to contribute to the spread. Did I mention she also had some fresh green veggies with hummus, as well as clover sugar cookies iced green as well. Green tablecloth, green candles around, green balloon. It was a GREAT dinner.

Well, the bread was pretty darn tasty! It has like 4 ingredients, and I had no expectations, but WOW. For any hard-core Irish readers, you'll probably be offended by both the recipe and the pictures, but, oh well!

Whole Wheat Irish Soda Bread
Adapted from Eating Well

2 cups whole wheat flour
2 cups all purpose flour (Plus more for sprinkling)
1 tsp salt
1 tsp baking soda
2 1/4 cup buttermilk
OPTIONAL: 1 tsp oats to sprinkle on top of the loaf


Preheat oven to 450

Spray a baking sheet (I used a stone) with cooking spray and sprinkle with flour.

Also, sprinkle a counter space with flour, and have a little extra ready for your hands!

Whisk together your flours, salt, and baking soda.


Now, form a well in the middle, and slowly pour your buttermilk into the well.


WITH ONE HAND, yes your own hand, mix them together just until combined, working from the inside out. The dough will be extremely sticky, thats why you want to avoid a spoon or mixing aid etc.

Once its ready, place dough onto floured surface. Wash your sticky hand, and then coat both your hands with some flour. Roll and pat the dough just to tidy up and give it a round shape. Then, flip the dough. Place onto your prepared baking sheet/stone.


With a serrated knife, make a deep cross cut in the center of the dough, and prick each of the quadrants.


IF YOU WANT, sprinkle some oats on top


Place in the oven and bake for 20 minutes.


Then, reduce the heat to 400 degrees and bake anywhere from 20-35 more minutes until browning on top, and hollow to the tap. WATCH IT. If it gets too hard, it will dry out. Mine only needed 20 more minutes and it was PERFECT. A crunchy crust, a soft middle. OH WE LOVED IT!


Anyways, when its ready, just pull it out and place on a cooling rack for about 30 minutes. Serve with butter and/or honey.

It says it serves 12. We didn't even finish a whole quadrant. It's very dense and filling, but good! 

Enjoy :) Even if you aren't Irish!

(Tip: Some recipes I saw added 1 tsp of sugar to sweeten it a little. Others added caraway seeds or raisins etc. You could research a little and add your own twist. I just wanted to stick to the basics on my first time!)


A Mighty Tasty Turkey Meatloaf with Mashed SWEET Potatoes

Comfort food at its MAX right here. Unfortunately, we were running late to our small group, so the "End" pictures are not anything worth bragging about as I was trying to scarf down dinner and take some after-thought pictures! HOWEVER, this was one of the best recipes I've found for a healthy meatloaf. My husband polished off the entire thing in less than 24 hours, save the 1-2ish slices I was able to have. Needless to say, its on the menu next week again! WE LOVED IT!

As far as the potatoes go, nothing fancy there, but we loved them as well, so I'll post them after the meatloaf!

"Homestyle Turkey Meatloaf"
Adapted from Eating For Life Cookbook

1 1/2 pounds lean ground turkey (I only used 1lb because thats how its packaged here)
1 onion, chopped (I diced mine pretty small)
4 egg whites
1 cup salsa
3/4 cup Old Fashioned Oats, uncooked
1 pkg vegetable soup mix (dry)- this added some yummy flavor!
1/4 tsp black pepper
1/2 cup ketchup

Preheat your oven to 350 degrees and coat a loaf pan with cooking spray.

In a large bowl, compine the turkey, onion, egg whites, salsa, oats, soup mix, and black pepper. MIX WELL.


Press mixture into prepared loaf pan.


Spread the ketchup overtop.


Bake until meatloaf is no longer pink in the middle, about 60 minutes. (It may take longer. I bumped my oven up to 375 and it barely finished in an hour!) WORTH THE WAIT. I promise!


Enjoy :) 


Easy as it Gets Mashed Sweet Potatoes 

- 3 medium sized sweet potatoes
- Cumin
-Papria
-Salt
-Pepper
- Chili Powder
-DASH of ground red pepper

For you measurement freaks (I am one of them)- get over it. Just eyeball it and taste it. Anywhere from about 1/2tsp to 1tsp would be good!

Dice up your sweet potato (I leave skin on, but you could peel them first) and steam (Or boil, or microwave!) until soft and "mash-able."


Now, I put all of the spices in the bottom of a medium-sized bowl so that when i put the potatoes in to mash, they would start to absorb the seasonings. You could mash, and then add, or add while you mash. If you haven't noticed- this is no sophisticated recipe here.

Just look for an end result like this:


So yummy! Enjoy :) We also had some green beans with our loaf and potatoes. Like I said, a real comfort meal.

Friday, March 12, 2010

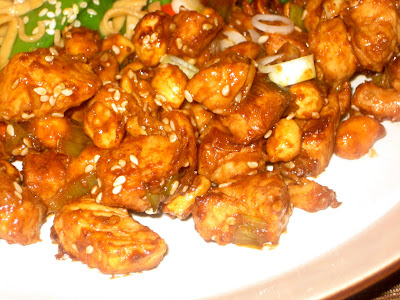
Kung Pao Chicken!

You want some real good, real authentic Chinese take out? Then this recipe is FOR YOU! Nick asked me for a "Wok Recipe" this week, and this one really delivered. You could serve this over rice and or some steamed veggies. I kind of used an older recipe from the blog for the Sesame Noodle Salad, however I found these really cool Spicy Sesame Linguine Noodles:

ANYWAYS! Back to the chicken!

Ingredients (Marinade):

2-3 Boneless Skinless chicken breasts, diced into bite size pieces
1 T Soy Sauce
1 T Rice Wine Vinegar
1 t Sesame Oil
1.5 t Cornstarch
Place all ingredients in a baggie and let chicken marinate about 25 minutes (Or longer if you want).

Meanwhile, whisk together your sauce, and cut up your veggies

Ingredients (Sauce):
2 T Soy Sauce
1 T Rice Wine Vinegar
1 tsp Sugar (I used 1 packet of Truvia Sugar Substitute)

Ingredients (Veggies):
4 green onions, sliced (Reserve some for garnish at the end)
3-4 cloves of garlic, minced

Ingredients (Other):
1/2 t ground ginger
1/2 t ground cayenne pepper
1-2 T sesame oil (for stir-frying)
1/3 cup dry roasted peanuts
Optional: Sesame Seeds

Heat a large deep pan (preferably a wok) over medium heat. Add enough Sesame Oil to stir fry chicken for 5-6 minutes until no longer pink and probably about 80% done cooking. Remove and set aside.

Next, add some more sesame oil as needed, and then add your garlic, green onions, ginger, and red pepper.

After about 30 seconds, add sauce and bring to a boil (should happen quickly) Then add your chicken back to the pan to finish cooking
At this point, your chicken should only need about 2-3 more minutes on the heat to finish cooking.

Add in your reserved green onion, toss in the peanuts, and top with some sesame seeds. Toss for about 15-20 seconds and remove immediately!


Serve however you want. Here's our Sesame Linguine noodles with some red pepper and snow peas. Again, for this recipe, click on the link up at the top for Sesame Noodle Salad.


Does this look like real Chinese Kung Pao Chicken, or what!?


I hope you'll try it, and enjoy it :)